How Do You Install a Corner Bathtub Properly?
Upgrading your bathroom can completely change how your home feels, and one of the most popular upgrades today is a corner bathtub. These tubs look stylish, save space, and add a touch of luxury. But installing one is not as simple as dropping it into place. A poor installation can lead to leaks, uneven surfaces, and long-term damage to your floor and walls.
Also Read: First-Time Guide: Choosing Xian Tours for the Terracotta Warriors
In this guide, you will learn exactly how to install a corner bathtub properly, step by step. We will cover tools, preparation, common mistakes, and when it makes sense to hire a professional.
Introduction – Why Installing a Corner Bathtub the Right Way Matters
A corner bathtub is designed to fit neatly into the corner of your bathroom, making it perfect for smaller or modern layouts. But because of its shape and plumbing position, installation requires more planning than a standard rectangular tub.
If the tub is not level, not supported correctly, or not sealed properly, you may face problems like water leaks, cracked tiles, or even floor damage. Proper installation ensures comfort, safety, and a longer lifespan for your bathtub.
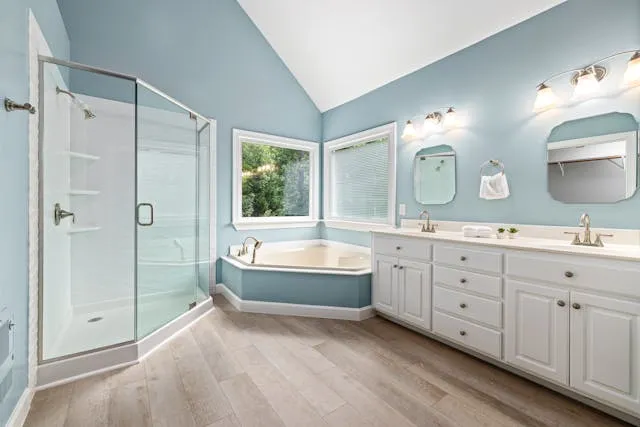
What Is a Corner Bathtub?
How Corner Bathtubs Are Different from Standard Tubs
Unlike traditional bathtubs that sit against one wall, corner bathtubs are shaped to fit into a corner, usually with a triangular or angled design. This layout helps save space while offering a deeper and more relaxing soak.
They often require special plumbing alignment and stronger floor support because they can hold more water and weight.
If you are still choosing a model, you can explore different types of Corner Bathtubs
Pros and Cons of Corner Bathtubs
Pros:
- Great for small bathrooms
- Stylish and modern look
- Often deeper than standard tubs
- Adds value to your home
Cons:
- More complex installation
- Harder plumbing access
- Usually more expensive
- Needs strong floor support
Tools and Materials You Need Before You Start
Basic Tools
Before starting, gather these tools:
- Tape measure
- Spirit level
- Drill and drill bits
- Adjustable wrench
- Screwdriver
- Utility knife
Installation Materials
You will also need:
- Silicone sealant
- Mortar or foam base
- Drain kit and overflow kit
- Waterproofing membrane
- Shims
- Screws and brackets
- Access panel
Preparing the Bathroom for Installation
Measure the Space Correctly
Start by measuring the corner where the tub will sit. Check wall-to-wall dimensions, ceiling height, and door clearance. Make sure there is enough room to move the tub into place.
Also, confirm that the drain location matches the bathtub drain position.
Check the Subfloor and Wall Studs
A filled corner bathtub is heavy. The subfloor must be strong and level. Inspect the floor joists and reinforce them if needed.
Check the wall studs too. The tub will be screwed into them, so they must be solid and properly spaced.
Turn Off Water and Remove Old Fixtures
Shut off the main water supply. If replacing an old tub, disconnect the plumbing, remove tiles if needed, and clean the area completely.
Step-by-Step Guide to Installing a Corner Bathtub
Step 1 – Dry Fit the Bathtub
Place the tub into position without mortar or adhesive. This helps you:
- Check the fit
- Confirm drain alignment
- Mark where brackets and screws will go
Remove the tub after marking everything.
Step 2 – Install the Drain and Overflow
Attach the drain flange and overflow kit to the bathtub. Connect the P-trap under the floor.
Make sure all fittings are tight but not over-tightened. This step is critical for preventing leaks later.
Step 3 – Apply Mortar Bed or Foam Base
Most corner bathtubs need extra support underneath. Spread a thick layer of mortar or foam base on the subfloor.
This supports the tub evenly and prevents movement or cracking over time.
Step 4 – Level and Secure the Tub
Lower the tub carefully into the mortar bed. Use a spirit level to check all sides.
If needed, add shims to adjust the height. Once level, secure the tub flange to the wall studs using screws or brackets.
Step 5 – Connect Plumbing Lines
Connect the hot and cold water lines and secure the drain pipe.
Before sealing anything, run water through the system and check for leaks around the drain, overflow, and pipe joints.
Step 6 – Seal and Waterproof
Apply silicone sealant along all edges where the tub meets the wall.
Install a waterproofing membrane behind tiles or wall panels to protect against moisture. This step is essential to prevent mold and water damage.
Tiling and Finishing Around the Tub
Install Wall Panels or Tiles
Use cement board behind tiles for extra moisture resistance. Apply tile adhesive, then place tiles carefully.
Once set, apply grout and seal it properly.
Add the Access Panel
Always install an access panel near the plumbing. This allows easy access for repairs or inspections in the future.
Skipping this step can make even small plumbing issues very expensive to fix.
Common Mistakes to Avoid
Not Leveling the Tub
An uneven tub causes water to pool and puts pressure on joints.
Skipping Mortar Support
Without support, the tub can flex, crack, or become noisy.
Poor Waterproofing
This leads to hidden leaks, mold, and damaged walls.
No Access Panel
Future repairs become extremely difficult.
Should You DIY or Hire a Professional?
When DIY Makes Sense
You can install it yourself if:
- The drain location is already correct
- You have basic plumbing skills
- The floor is already strong and level
When to Call a Plumber
Hire a professional if:
- You need to move plumbing lines
- Structural changes are required
- You want warranty protection
- You are unsure about waterproofing
In many cases, a licensed plumber ensures safety and saves money long term.
Final Checks After Installation
Leak Test
Fill the tub and let it drain fully. Check underneath for leaks.
Drain Test
Ensure water flows smoothly without slow drainage.
Comfort and Stability Check
Sit in the tub and gently move. It should feel solid and stable.
Conclusion – Get the Best Results from Your Corner Bathtub
Installing a corner bathtub properly requires planning, the right tools, and careful attention to detail. From checking the subfloor and aligning the drain to sealing and waterproofing, every step matters.
When done correctly, a corner bathtub adds comfort, beauty, and long-term value to your bathroom. Whether you choose DIY or professional installation, following these steps ensures your tub stays safe, leak-free, and enjoyable for years to come.